
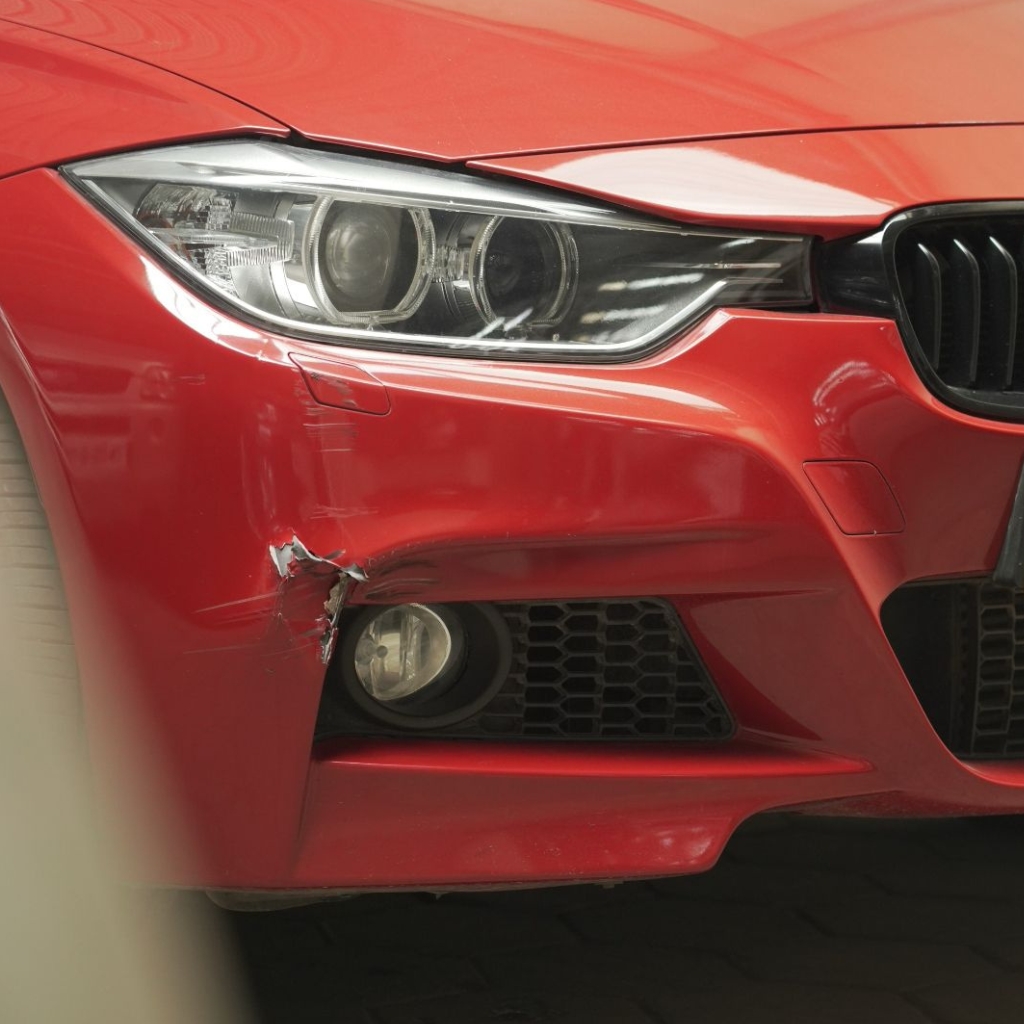
Front bumper damage on a BMW 320d in Chennai is almost a rite of passage. Basement car parks in malls and offices, peak-hour traffic on Anna Salai, vehicles squeezing past in gaps that are too narrow it does not take much. A low-speed impact is enough to crack a bumper, displace the sensor mounts, and push the lower trim out of alignment.
This 320d came in with a front bumper that had taken a clean hit, cracked across the lower section, the driver’s side fog lamp mount broken, and one parking sensor displaced. The owner wanted it done properly: correct replacement bumper, sensors transferred and recalibrated, and the paint matched to the car’s Melbourne Red so there was no visible difference between the new bumper and the rest of the front end.
The job was handled at Detail Dynamics, our dedicated body shop at the same Guindy facility. Here is how the repair was planned and what the job involved.
BMW Body Shop Chennai: Detail Dynamics — Multi-Brand Body Shop at Evolve Automotive |
+91 98849 88632 · Mon–Sat 10AM–7PM
Why a BMW Front Bumper Is Not a Simple Swap
People sometimes assume a bumper replacement is straightforward take the old one off, put the new one on. On a BMW 320d it is a more involved job than that, and doing it carelessly creates problems that show up later.
The front bumper on the F30 320d carries the parking sensors, the front fog lamps, the lower grille, the bumper trim strips, and the impact absorber foam behind the outer skin. All of these need to come off the damaged bumper and be correctly transferred and refitted to the new one. The sensor brackets are fragile and often crack when removed roughly; a new bracket costs more than the care it takes to remove the old one properly.
The bumper also has to fit correctly to the adjacent panels, the front wings, the bonnet, and the lower lip. On a BMW, the panel gaps are tight and consistent. A bumper that is even slightly out of position reads as wrong immediately. Getting the fitment right requires checking the gaps against all surrounding panels before the bumper is bolted down, not after.
Removing the Damaged Bumper : What We Found Underneath
Once the damaged bumper was off, the crash structure behind it was inspected. The impact absorber foam had taken the energy of the hit and compressed which is exactly what it is designed to do and needed to be replaced along with the bumper skin. The bumper beam itself was undamaged, which is the best outcome in this kind of impact. The beam is a structural component and its replacement is a significantly bigger job.
The sensor brackets on the driver’s side had cracked at the impact point, as expected. New brackets were sourced. The fog lamp unit on that side was also cracked at the mounting tab. Replacement was the correct call: a cracked fog lamp housing lets water in and damages the bulb within a few wet seasons.
Fitting the Replacement Bumper
The replacement bumper came in unpainted which is standard for OEM-specification parts. Painting before fit is the correct sequence for a quality job: the bumper goes into the booth as a bare component, gets primed, colour-coated, and clear-coated properly, then is fitted to the car once the paint has fully cured. Painting a bumper while it is on the car produces a worse result because you cannot get proper access to the edges and returns.
Before the new bumper went into the booth, all the components that needed to transfer across were laid out sensors, fog lamp, grille, trim strips and checked against the new shell to confirm everything would fit correctly. One sensor bracket needed a slight adjustment to the clip position to seat properly in the new bumper’s housing.
Paint Matching Melbourne Red on a BMW Getting It Right
The replacement bumper came in unpainted, which is standard for OEM-specification parts. Painting before fitting is the correct sequence: the bumper goes into the booth as a bare component, gets primed, colour-coated, and clear-coated properly, then is fitted to the car once the paint has fully cured. Painting a bumper while it is on the car produces a worse result because access to the edges and returns is limited.
Melbourne Red (BMW paint code A75) is one of the more demanding colours to match well. Red paint shifts in shade depending on the film thickness applied and the angle of light. A bumper that looks correct in the shade of a workshop can look slightly off next to the original panels in direct sunlight. The colour was mixed using the computerised mixing system against the car’s paint code and verified against the front wing in natural light before application.
The bumper went through the booth in the correct sequence: grey primer, red base coat in the correct number of passes, clear lacquer at the right film build. After curing, the bumper was fitted and the panel gaps were set before any final polishing. Standing at the front of the car and looking along the panel line from wing to bumper no visible shade difference, consistent gloss level, gaps matching the other side.
Sensor Calibration and Final Check
The four parking sensors were refitted to the new bumper and connected. The front PDC system was tested with a diagnostic tool to confirm all four sensors were reading correctly and at the correct depth. A sensor that is slightly proud of the bumper surface or slightly recessed gives inconsistent distance readings — the fitment depth matters, not just whether the sensor is plugged in.
A final walk-around inspection was carried out in natural light. Panel gaps, paint finish, sensor function, fog lamp operation, lower grille alignment — everything confirmed correct before the car was returned.
For denting, painting and body repair work on BMW cars in Chennai, Evolve Automotive operates Detail Dynamics — a dedicated multi-brand body shop at the same Guindy facility, handling bumper repair, panel replacement, and factory colour matching using the Asian PPG waterbase system.
A BMW 320d front bumper replacement is easy to rush and hard to undo if it goes wrong. Fitment gaps that are off, paint that does not match in sunlight, sensors that read incorrectly — these are all fixable but they require going back to the start. The correct approach is to plan the job in sequence: inspect the crash structure first, source the correct replacement parts, paint the bumper as a separate component before fitting, set the panel gaps before finalising, and test every sensor before the car leaves. |
Premium European Car Service: Premium Car Service Hub at Evolve Automotive |
Frequently Asked Questions
Does a BMW 320d front bumper replacement require sensor recalibration?
Yes. The parking sensors need to be correctly seated in the new bumper housing and tested with a diagnostic tool after fitting. A sensor that is displaced or incorrectly seated gives inconsistent distance readings and can trigger false warnings or fail to warn at the correct distance. At Detail Dynamics, all sensors are tested with a diagnostic tool after every bumper replacement before the car is returned to the owner.
Should a BMW bumper be painted before or after fitting?
A BMW bumper should be painted before fitting. Painting the bumper as a separate bare component gives full access to all surfaces, edges, and returns — the areas that are difficult to reach once the bumper is on the car. The correct sequence is: prime the bare bumper, apply the base coat and clear coat in a controlled booth environment, allow full cure, then fit to the car and set panel gaps. Painting on the car produces visibly inferior results at the edges and in the return sections.
How long does a BMW 320d front bumper replacement take?
A BMW 320d front bumper replacement including painting typically takes three to four working days. The paint needs to cure properly before the bumper is fitted, and the fitting itself involves setting panel gaps carefully against the front wings, bonnet, and lower lip. Rushing the cure time or the gap-setting stage produces a result that looks wrong. The timeline is confirmed after the initial inspection and agreed before work begins.
Can a BMW bumper be repaired instead of replaced?
A BMW bumper can be repaired rather than replaced when the damage is limited to surface scuffs, shallow cracks away from sensor mounts, or minor deformation that does not affect the fit to adjacent panels. Cracks at the impact point, broken sensor brackets, or a displaced fog lamp housing generally make replacement the more durable and cost-effective option, as repaired structural sections in these areas tend to fail again under subsequent minor impacts. Each bumper is assessed individually before a recommendation is made.
Will the new bumper match my BMW’s paint colour exactly?
Yes, when the paint process is carried out correctly. The colour is mixed using the vehicle’s paint code through a computerised mixing system and verified against the adjacent panels in natural light before application. BMW Melbourne Red and other solid or metallic reds require particular care because they are sensitive to film thickness and application technique — a slight variation in the number of passes changes the depth and shade of the finished colour. Verification in natural light before application is the step that catches any formula adjustment needed.
Book Your BMW Bumper Repair Assessment 49 & 51/2, Thiru-Vi-Ka Industrial Estate, Guindy, Chennai, Tamil Nadu 600032 Mon-Sat: 10AM-7PM | WhatsApp: 98849 88632 |
Detail Dynamics at Evolve Automotive — BMW Body Shop, Guindy, Chennai Dedicated multi-brand body shop for bumper replacement, panel repair, denting and painting. BMW, Mercedes-Benz, Audi and all European cars. Asian PPG waterbase system with factory colour matching. Call / WhatsApp: 98849 88632 | Detail Dynamics Body Shop at Evolve Automotive |